Tuesday, 31 March 2015

Topshop Contour Tips & Tricks


SOOO... here it is as promised! Some more make-up reviews/tips after the massive success from my previous make-up post (over 500 views!!) and once again, I'm not a make-up artist of any description, just sharing a few of my tips&tricks :)

This one is just a little review on some of my recent Topshop make-up I've decided to test out!  When all of Topshop's make-up was first released, I never went and brought anything from their range just because they are a clothes shop, not a make-up store.. and I just thought it would be another money making thing and the stuff probably wouldn't be that great. Not so long ago, I really needed a red lipstick for a night out that night, and I just happened to be in Topshop at the time.. in a bit of a rush and I ended up grabbing the red lipstick and red lip liner there and then.  And after trying it, I was pleasantly suprised at how good it was!  Then I was browsing a few weeks back and came across their new contour cream, and fancied trying it out, so I thought why not? They do this cream in two different shades, swerve and sweep.. and I went for swerve as it was the darkest out of the two.  I got a little stippling/contour brush to go with it to save using my fingers.  After using this a few times I went back to get the glow stick, which is like a creamy highlighter in the shade 'Play Up', to help blend in the darker cream!  As I'm new to the whole contour scene, I haven't spent loads and loads of money on anything for contouring yet, just need to get my practice in first haha! :)  So this little blog post is on the 3 products I use for the base contour for my daily make-up routine and how I use them on my face, and I hope you enjoy :)


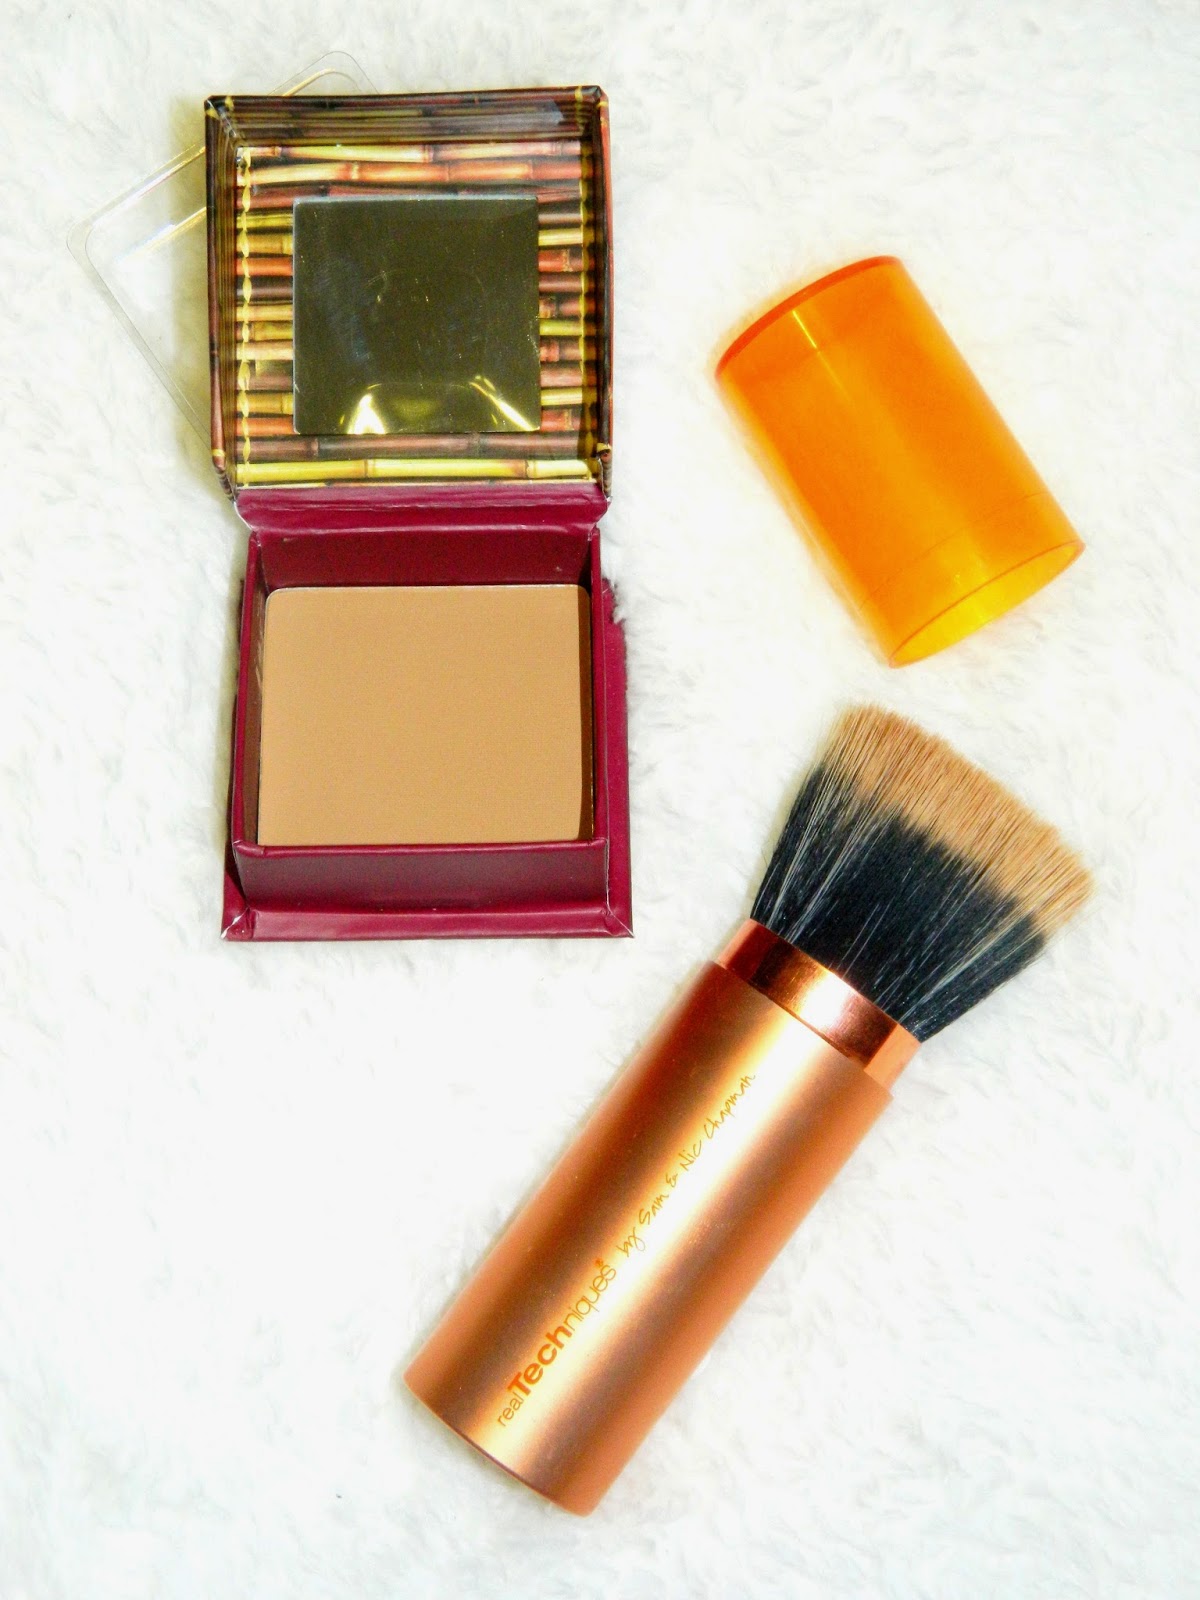
So this is the contour cream in shade 'Swerve', comes in a little pot along with a mirror.

This is the stippling brush I use to blend in both creams.


And this is the glow stick (highlighter) I use to highlight my skin.


This is before any contouring has been done! I've applied my Estee Lauder Double Wear Foundation all over my skin, and used my Nars powder to finish off (see my other post for more details on those).. and I've also done my brows here.


The contour cream I have applied from above my ears down my cheeks towards the corner of my mouth in one movement using my stippling brush.  The contour cream is then applied all above the ear (about an inch above) along the hairline, across the hairline on the top of my face, and along my jawline. When doing the cream on my cheeks, I always make sure the movement is from my ear downwards, and if I need to go over it again, I always go from the ear area and not half way down my cheek as you don't want the darkest part being in the middle of your cheek haha! I sometimes find it easier to dab the cream on with my finger for the top of my head and jawline if I want a more subtle finish.  I've also got a slight amount of contour cream either side of my nose.


The glow stick is so easy to use! Literally just take the lid of and your ready to go! I've rolled the slow stick across my cheek bones above where the contour cream has been applied, and also below it, just to add more contrast.  The highlighter has then been rolled up the whole centre of my face, so from the chin area, the little gap between my mouth and nose, across the top of my nose and to my forehead, and then horizontally across my forehead.  The highlighter basically highlights all the areas that the sun hits, and the contour cream emphasises the areas more shaded on your face.


Then I've just used my stippling brush to blend everything all together! You might want to use a different brush if your a bit conscious about all the dark contour cream still being on your stippling brush.  I've started from the darker contour cream on my cheeks and blended upwards into the highlighter, and then the same again downwards. My forehead has then been blended together from the highlighter up towards the contour, just so the contour doesn't come to far down my forehead, this way the highlighter goes over the contour slightly so the darker cream is right in the hairline (where you want it).  Be sure that all harsh lines have been blended in properly but so you can still see the contrast between the two different shades.


And WALAAH! Here you have it, a quick base to my contour with three easy to use products. I then go over this with powdered bronzer/highlighter just to give it a nice smooth finish along with my powder, but you can always just leave it at this if you prefer :)


 Thanks for reading, and I hope this helps any beginners who are just starting to get used to contouring, or those who are completely stuck as to which products to use for this.. and those who have never tried Topshop make-up before because they had the same thought process as me haha! 
Much Love xo

Contour Cream: Topshop

Glow Stick: Topshop

Stippling Brush: Topshop (not online)


Before & After:


SHARE:

Monday, 30 March 2015

Slogan Tee's

SHARE:

Friday, 27 March 2015

Leopard Print and Thigh High Booties


SOOO... I can't believe it's been nearly 2 weeks since my last post!! I've been soooo busy with uni work and my dissertation (which is finally complete, YES!) that I literally haven't had the chance to even think about blogging!.. so massive apologies, and I promise I will be making up for it over the next few weeks as I have so many outfits planned haha :)

Anyway, back from the boring stuff and onto the interesting stuff.. clothes! So this little beauty is so perfect for the weather right now, cheeky little skirt but staying warm with thigh high boots and a turtle neck jumper! This skirt is the one!.. the material is amazing, and its perfect for day or night, with whatever you wanna dress it up with :) The boots have had so many comments about them, everyone needs a pair of thigh high boots in their life.. or a few in different colours if your like me haha :) The trench is one of my faves at the minute, it's getting that little bit warmer, but I can't leave my coats behind, so this is the perfect thickness and goes with everything.. and what better thing to wear than a camel coat..because I LOVE THEM! :)

Trench Coat: Topshop. (Similar Here).. Topshop

Top: Primark. (Similar Here).. Pretty Little Thing

Skirt: Topshop

Boots: Public Desire 


Necklace: Miss Selfridge


SHARE:

Sunday, 15 March 2015

A Look Into My Daily Make-up Products


SOOO... this post is basically about all the products I use from start to finish of my make-up regime :) This is just an overall look into all of my products that I use for my everyday look as I get people asking me everyday 'What foundation do you use?' 'What lipstick are you wearing?' 'What do you put on your brows?' so on and so far.. so hopefully this should answer everybody's questions haha! :)  I will do other posts at a later date on how to get different looks such as night out makeup and more detailed posts into all of my products and reviews.. but for now this is what I normally use on a everyday basis.. I hope you enjoy & helps you out a little :)


Firstly, I use Benefits 'the Pore Fessional' and apply this all over my face.  This just evens the skin tone out and I find it makes my skin smooth ready to apply my foundation.  For the big bottle of this it's around £24.50 but lasts for ages if you use just a dab each day, but they do little samples you can use to try it out at first :)


Then it's time for the main base, the foundation! I do have a few different foundations, such as Benefits and Mac ones, but this one is my favourite so far for an everyday natural look!  This is the Estee Lauder Double Wear, shade Rattan.. but if you go into a Selfridges store or Debenhams etc, they will usually match up you to your own skin colour :) it is on the little pricey side at around £30/31 for the bottle! It sounds expensive.. but it is so worth it!! And it's lasted me for months and months which is amazing for foundation!  I apply this on with my Real Techniques Round brush with a flat face, I don't think it is an actual foundation brush from their collection, but I prefer it for my foundation to stop the lines you get with a normal flat foundation brush!


Next comes the powder! I also have a few powders such as Urban Decay, Mac and Kiko, but this Nars one is perfect for just a light coverage over the top of your foundation! I apply this with my kiko powder brush which is like the best powder brush ever, so so soft!! I think the Nars is around £24/25 and I have the shade 'Beach'.. but if you go into a Selfridges store, the people there will match your colour up for you :)


I have a slight obsession with the Benefits Hoola.. as you can see haha :) But this is amazing to use as either a bronzer on your cheek bones, or to apply all over your face.  I use this on myself as an all over colour, just to give me face a slightly browner look, and I mean just the slightest slightest bit all over (or it looks way to much haha!).. They last forever.. hence why I've ended up with such a collection, my first one I brought about 2 and a half years ago and it's still going strong ha! For each one it's around £24.50 I think and it comes with the little brush included.  For an all over coverage that I do, I use the Real Techniques bronzer brush which gives me the light coverage I'm after.


Then comes the contour and highligher!  I've only just started to do contouring recently so to practice a little I've been using this 'Seventeen Define & Conquer' palette which I brought from Boots for like £6! And for the price you can not go wrong at all! I use the contour and apply this from by my ear, down my cheek in the direction of the corner of my mouth, my hair line around the edge of my face and my jaw line. I then use the highligher and apply this to everywhere the contour isn't really, just to define the contour and the darker bits of my face! :) I use a little Mac brush for this that I had in a set, but you can get contour brushes from anywhere that will do the same trick.


Then comes the 'Naked Flushed' Palette, which I use to just add a little to my contour I did before.  These are around £22 for the palette, and the brush for this is £22 too which I use to apply it, but it is amazing!  I use the bronzer section of this and go over the contour I've already done, just to add that nice brown colour in this palette over the top, and then the highlighter over my cheek bones, nose, a little on my forehead and on my chin.  It has a little sparkle to it so you don't want to apply too much of the highlighter! And then if you want to add a little colour to your cheeks.. use the blush which is also in this palette.


I use the bigger side of the brush for the bronzer and the blush.. and then the little side of the brush for my highligher as you can see :)


 For the brows.. it's all the basics really! I firstly brush my brows down with the brush end of the Loreal Brow Pencil, which you can get for like £6 I would say, and then I apply the pencil around the edge of my brows to define and give them a good shape.  I fill in the rest of my brows then using my little 'Kelly Brook' eyebrow palette which I brought from New Look for about £3.. but it works a treat!  It's got a cream and a powder section in there which all depends on how thick you want your brows to look! For me, I just use the powder section of this.


 For my eyes.. I use 'They're Real Push Up Liner' by Benefits for the top liner along my lashes on my eye lid.. It does take a bit of getting used to if you've never used one before, but when you get the hang off how this works, it's amazing.. especially for those who like winged eyeliner! It's around £19ish for the liner.  I use the 'Khol' liner by Maybelline that I brought from Boot's for around £6 i think.  I use this on my bottom lash line and use my little Real Techniques brush across the same line, so that the liner doesn't look as harsh and blends in nicely for a more softer look :)


I use so many mascaras any day and everyday! I absolutely love the Benefits 'They're Real' mascara which is around £20, as it separates my lashes so nicely, but I try to only use it every now and again because of the price, but also because it seems to run out sooo fast! :( So I use Rimmel usually for my mascaras which you can get from places such as Superdrugs or Boots for about £7-10 and work just as well if you pick one with the perfect brush!


Now for my favourite part.. the LIPS! I have never ever ever worn lipsticks up until a couple of months ago, and now you rarely see me without it on! It's not always a bright one I wear, but sometimes just very nude colours.  As an everyday more subtle lipstick I will use either Mac 'Honey Love' lipstick with the Mac 'Boldly Bare' lip liner which is a very pale brown shade.. or Mac 'Please Me' lipstick with Mac 'Hip N Happy' lip liner, which is a very pale pink shade!  My most recent Mac purchased are shown below and is the Mac 'Velvet Teddy' lip stick, which has a matte finish and is a slightly darker brown tone that Honey Love, and I use Mac 'Spice' with that one.. or for a brighter look I purchased the 'Flat out Fabulous' with the liner 'Fashion Boost' which is a purply/pink shade (so so gorgeous)! :) 


SOOO... Thats basically everything I use most mornings for my more natural make-up look and I hope it has helped a few of you out for future purchases :) I will be doing more of my blog posts on my next purchased and different looks that people ask me about! 
Much Love xo

SHARE:
© 2025 A Fashion Fix Up. All rights reserved.
Designer Blogger Template by pipdig